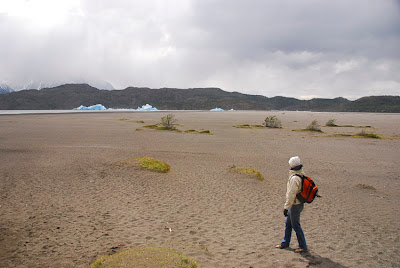
Here is Lesa contemplating walking out on the beach to the icebergs that had been blown into Lago Grey. We only made it a few hundred yards and had to turn back because we were literally being blown off our feet.
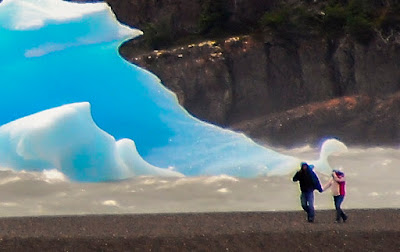
Here’s a cropped close-up of a couple struggling to shield their faces from the spray and flying sand.
Taking photographs on blustery days presents a number of challenges, including:
- Getting a sharp image
- Getting a clean image
- Protecting your gear
- Protecting yourself
Here are a few tips to reduce the effects of camera shake:
- Use the heaviest-duty tripod you can carry, lock your elbows on your body as you are shooting, or brace the camera and yourself on firm supports, e.g., rocks, buildings, or anything else that won’t wobble in the breeze.
- If you are using a tripod, use a wireless remote rather than pressing the shutter release which will introduce some additional camera shake. Nikon’s ML-L3 Wireless Infrared Remote Control costs about $25 CAD and the battery on mine has lasted for years.
- Use any available image stabilization features of your camera or lenses. Nikon calls this vibration reduction (VR); Canon: image stabilization (IS); Tamron: vibration compensation (VC).
- Freeze the action by using the fastest shutter speed you can get away with (i.e., 1/250 of a second or higher).
- At the risk of introducing a bit of noise, consider using a higher ISO, i.e., above 400 (depending on your camera). If you do, also consider using High ISO noise reduction, if available, to reduce the graininess of the image.
- Improve your odds by taking multiple captures in quick succession in hopes that at least one will be in focus. To do this, use continuous shutter release mode.
Keep your mirror and sensor clean
If you need to change lenses, keep the inside of the camera (mirror and high-pass filter) clean by sheltering the camera body and lens from the wind and making the lens changes as quickly as you can.
If you can, before you put on the new lens, keep the body facing down and give the mirror a quick blow with a bulb blower.
Check that your sensor’s high-pass filter is free of dust (especially if you change lenses frequently). Take a shot of the sky, or other light-coloured expanse, and then view the entire image on the camera’s LCD at 100%, or the maximum available enlargement. Dust will appear as dark spots. You should do this periodically any time you are out shooting.
For example, the image below, taken off Middle Cove near St. John’s Newfoundland in May, is the victim of a dirty high-pass filter – look in the top-right for the spots:
Here is a 100% crop of the same image that clearly shows the spots as they would have appeared on my D7000’s LCD. (Too bad I didn't follow my own advice...)
Cleaning the high-pass filter isn’t as difficult as many think. However, you do need to know what you are doing, so be sure to follow the instructions and try it at home first. If you need to clean it when you are out shooting, do it in the most protected area you can find.
I recommend that you always carry a travel-size sensor cleaning kit in your camera bag. I use VisibleDust VSwabs™ and VDust Plus™ cleaning solution, but there are lots of other equally good products on the market.
Keep your lens filter clean
Dust, spray and finger prints can too easily find their way on to the lens filter. Be sure to inspect the filter often and use a bulb blower, or soft lens cloth if necessary, to remove the nasty bits.
Protecting your gear
- Attach a UV or other filter to protect lenses from blowing sand and spray (especially salt water) that can damage the lens without a filter. Filters are far less expensive to replace than your lens.
- Keep the lens cap on whenever possible to protect the filter.
- Keep a plastic bag over your lens (and entire camera if possible) while you are out in the elements, and remove it when only when you are shooting.
- Keep your camera bag closed as much as possible to keep out dust and spray.
- Keep your lenses and body in plastic bags when in your camera bag.
Don’t forget about staying safe yourself!
Here are few things to consider packing to protect yourself:
- a good windbreaker with a hood
- extra hat (they tend to blow away)
- extra sunglasses
- sturdy footwear


